Showing posts with label recycled. Show all posts

Thursday, April 1, 2010

Update: Overalls project

Jasper in his baggy overalls

I sewed the cuffs on the pant legs in the hopes that they would keep the pants in place a little better when Jasper crawled around in them. Fail. They're cute--I used the serger to flatlock them on with the red thread, so it's cute and all, but as soon as he started crawling away (i.e., immediately), they got all bunched up again.


But, the good news is that they might now be big enough for him to wear next fall, and he probably won't be crawling too much by then. So perhaps this post will get a third installment around October or so.


new cuffs

See the original post on these overalls here.

Saturday, February 27, 2010

Baby overalls from an old shirt

baby overalls from an old shirt

So I got a snap press this week. It's very exciting. For me. Maybe not for you. But now I can make baby clothes with all those crotch/leg snaps without having to deal with snap tape or--even worse--a hammer and that cheap plastic clamp thing Dritz makes that I hate.

Anyway, this snap press is great for converting velco diapers to snap diapers (and since we have a bunch of diapers with useless, wasted velco, that's a great thing.) But that's not the project I'm excited about right now.

I've been pulling out my old clothes that I no longer wear--the Hartstings truck is making a stop at our house next week. But in the case of some of my old clothes, I don't like the garment itself anymore, but I do still like the fabric. And this L.L.Bean shirt is a perfect example. I've had it since junior high or so, so it's super soft. It's wool jersey on the outside and soft cotton jersey on the inside. Sounds like some nice warm, soft baby overalls are in order!

So the shirt I started with is the L.L. Bean Two-Layer River Driver henley shirt. It doesn't look like they still make the exact same thing, but here's the crew neck version. (no I wasn't smart enough to take a picture of the shirt before I hacked it to bits.) The nice thing about the henley style is that, if you preserve the neck band, you've got the front buttons in place to make it easy to take off baby's head (then again, most adult neckbands are probably big enough to take over a baby's head.)

Anyway, I set out to make the overalls with the serger. And with one little exception, I didn't need the regular sewing machine at all. The plan was to use the roll hem on the armholes, inseam, and leg cuffs and the 4-thread overlock on the seams. It wound up being a pretty easy project--one I could probably have finished during Jasper's nap if a) I hadn't been figuring it out as I went and b) he'd taken a decent nap today.

So this is not exactly a tutorial--I won't go into that much detail--but more like loose instructions that someone who's pretty adept at using the serger could probably use to figure it out. Or it's just a really vague tutorial.

First, I cut all the pieces out.

baby overalls -- pieces cut out from shirt

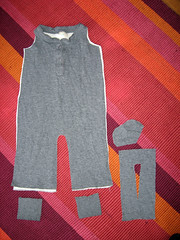
I cut out the body, keeping the bottom hem in place as well as the neck line. I used another romper as a guide to where the crotch and armholes should be. Note that he's about a size 18 months and the length of the shirt worked well. Smaller sizes would need the bottom cut too; larger would need something sewn on the bottom. (More on that later.) I also cut out the crotch extension piece and a facing for the back snap opening. I cut off the cuffs too, though I wasn't sure if I'd use them. (For taller babies, this is an easy way to add some length.)

First, I sewed the crotch onto the back of the overalls. (I first basted with the sewing machine because I needed to ease the pieces together and I wasn't too confident that I'd do that well with the serger. A more experienced serger could skip that step.)

overalls bottom

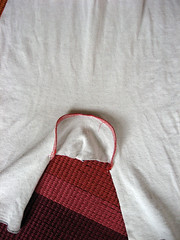
Then I serged the snap facing to the legs and crotch.

overalls bottom

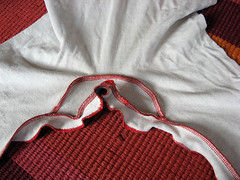
Next I roll hemmed the arm holes, the edges of the inseam and snap facing, and, since I was using contrasting thread, the bottom of the legs too.

neck and armholes

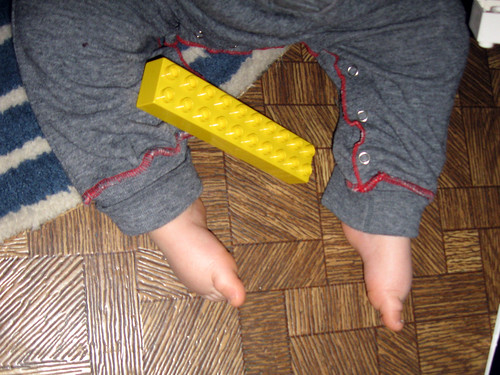
Then I serged the sides and put snaps all along the leg openings. Ta da!
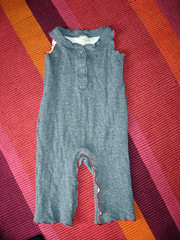
baby overalls from an old shirt

And found a model:

baby overalls from an old shirt baby overalls from an old shirt

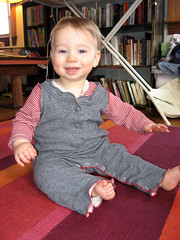
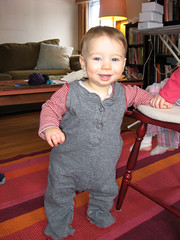
Beautiful! Until he started moving around in it. That's when it occured to me that adding the cuffs to the legs might come in handy. He's a crawler/cruiser, and tends to crawl out of the legs.

baby overalls from an old shirt baby overalls from an old shirt

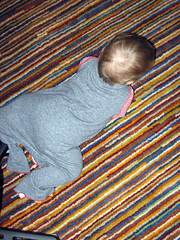
So I will add some cuffs tonight and add an epilogue to this post once I get some new pictures.

Monday, May 19, 2008

Play Kitchen, part 2

I finished the kitchen! It's set up in the (real) kitchen now, and it appears to be a stunning success. Boozle washes her hands, bakes pizza, and boils pizza toppings.

Here's a video of her first time playing with it:


And some photos of the finished product:

Play Kitchen, done! Play Kitchen, done!

[continued from Play Kitchen, part 1]

Saturday, May 10, 2008

Play Kitchen, part 1

For the last two weeks, I've been working on designing and building a play kitchen. I was inspired when Boozle and I took a trip to the super cool toy store in Northampton, and they had a really nice wooden play kitchen. Not willing to pay $150 for the kitchen, however, but more than willing to give Boozle her own kitchen (so when she wants to help cook, she can help on her own stovetop), I started thinking.

A trip to ReStore and then to our junk-laden basement, and a design developed. Starting with a cabinet we removed from our kitchen, I figured I could paint a couple burners on top, add a sink and faucet, and in front, put a cupboard and oven door.


cabinet

legs

It needs a little height, so I'll attach it (somehow, not sure) to this shelf thing (from a previous project, a part that doesn't get used anymore).


cut_door

I took a cupboard door off another spare cabinet to make the door. I had to cut it down to make it fit. If I get really ambitious, I will try to cut the trim and glue it back together. I doubt such ambition will strike, however.


inside


The inside needed a divider, since you can't bake stuff in a cupboard. Some wood from the basement did the trick for that. I found shelf supports and drilled new holes so that the oven and cupboard could both have one shelf inside.


top_view

I cut holes in the top to fit a faucet (thanks ReStore!) and sink (dog dish!). Miraculously, their undersides fit between the top piece and top of the cabinet, so I won't have to cut out holes in the cabinet. The bowl/sink sits about 1/4" above the counter top, but some caulk will take care of that (and keep the bowl in the hole).


oven knob


There is always a point in any project I do where I do things out of order or backwards or upside down. And I have to rip out, undo, or break things to correct the error. I hit that point today when I nailed and glued the top pieces on the cabinet, then tried to put the oven/stovetop knobs on the front.

Since they need to be screwed in from behind, and I had just sealed off said behind, I had to pull the top off. Luckily, it came off pretty easily. The knobs were installed (also ReStore parts), and the top replaced.


front_view

After that, I decided to call it a day. Boozle will likely be waking up from her nap soon anyway.

Still remaining to do: oven needs a cutout with plexiglass (so you can see the pizza baking!); shelves need to be cut; lots of cleaning, painting, and probably some contact paper to be applied. Oh, and those legs need to be attached.

To be continued! [part 2]